- Server Guide
Lasso 9 Instance Administration
Lasso Professional Server provides a convenient, Web-based interface for configuring Lasso instance settings, managing and maintaining databases, and much more. This interface is referred to as the Lasso Server Admin.
This chapter provides an overview of Instance Administration, and is divided into the following sections.
- Accessing Instance Administration describes how to connect to Instance Administration.
- Exploring Instance Administration describes the three main sections of Instance Administration.
- Interface Elements describes the interface elements and conventions used in Instance Administration.
- Lasso Internal Databases provides an overview of the internal SQLite databases that power Instance Administration and Lasso Professional Server.
The Lasso Server Admin is accessed via a Web browser similar to a standard HTML page and can be accessed in any Web browser that meets the Web browser requirements listed in the configuration sections of this guide.
To access Instance Administration:
Lasso Server can have multiple independent instances defined within Lasso Instance Manager. Each instance handles incoming Web requests based on the host name used to access the admin.
A single instance will capture all incoming Web requests. If no additional instances have been created, then Lasso Server Admin for the sole instance can be accessed using one of the following URLs. Use
localhost if accessing Lasso Server Admin from a browser on the same machine as the Lasso Service. Otherwise, replace www.example.com with the actual domain name or IP address.
http://www.example.com/lasso9/admin
http://localhost/lasso9/admin
To access the Lasso Server Admin for a particular instance, it is necessary to construct a URL that meets the criteria for the instance. For example, if an instance has a criteria specifying that the host name must be secure.example.com then the following URL would load the Lasso Server Admin for that instance:
http://secure.example.com/lasso9/admin
The Web browser should prompt for the administrator username and password. The Web browser will not prompt if the Lasso Server Admin has already been accessed using the browser in the current session or if the authentication information has been stored in a keychain, passport, or browser preferences.
If an error is displayed, make sure Lasso Service and the Web server are running as described in the configuration sections of this guide.

Exploring Instance Administration
Lasso 9 Server provides a new streamlined administration interface, referred to here as the Lasso Server Admin. The Lasso Server Admin is primarily navigated by using the pop up menu on the upper left portion of the page.
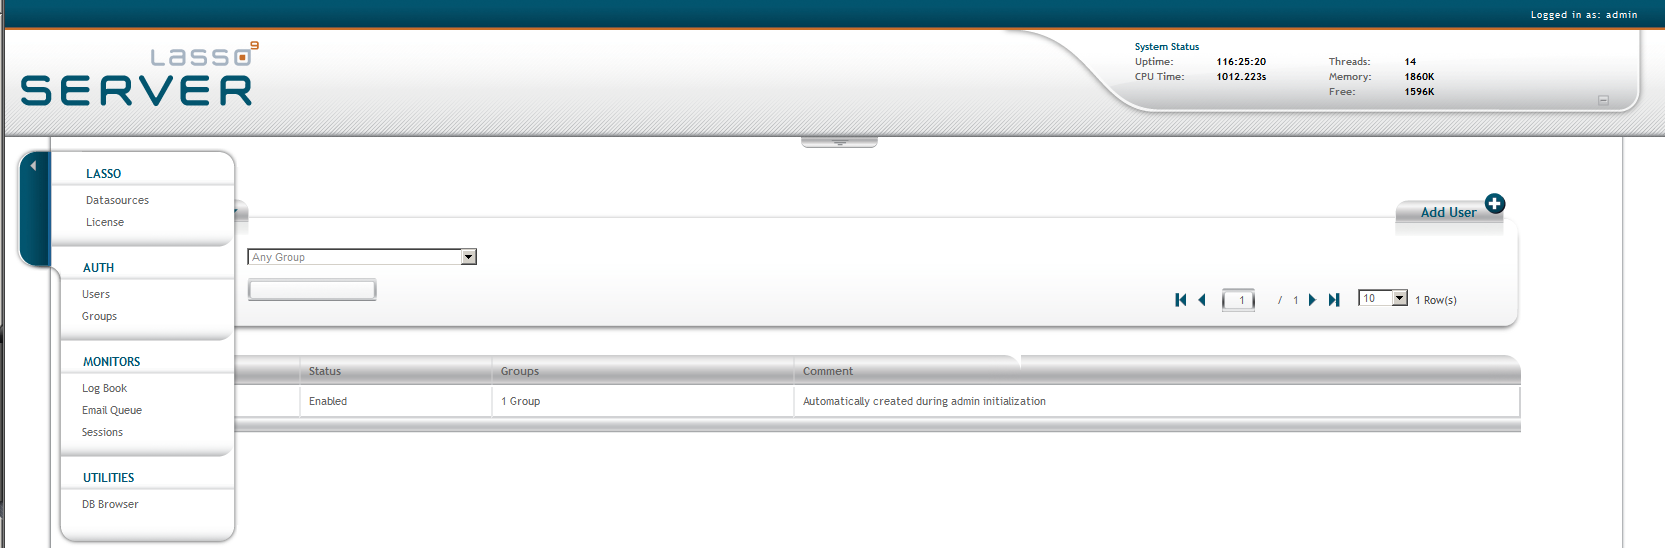
Main Menu
-
Lasso
- Datasources - Configure data sources.
- License - Enter license.
-
Auth
- Users - Configure Lasso users.
- Groups - Configure Lasso groups.
-
Monitors
- Log Book - View log messages & configure logging settings.
- Email Queue - View emails currently in queue.
- Sessions - View active sessions, delete expired sessions, and change session settings.
-
Utilities
- DB Browser - Manage databases.
System Status
The System Status tab, located in the top right portion of the page, contains information regarding the Lasso Server process.
- Uptime: Length of time current Lasso Server process has been running.
- CPU Time:
- Threads: Number of threads in use by current Lasso Server process.
- Memory:
- Free:
Lasso Quick Code
Lasso Quick Code allows you to run code snippets within the Lasso Server Admin web interface. The Lasso Quick Code console can opened by clicking the arrow tab in the top, center of the page.
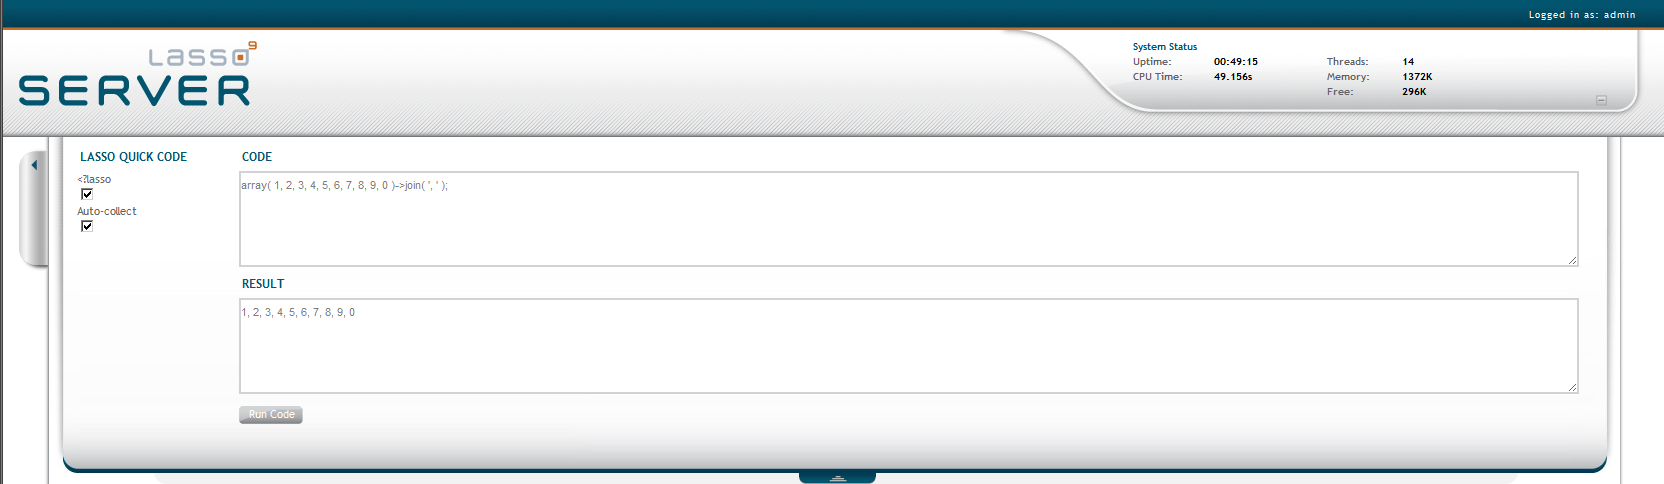
The Lasso Quick Code console has two configurable options:
-
?Lasso
- When this option is checked, Lasso Quick Code defaults to LassoScript coding. The opening
-
Auto-collect
- When this options is checked, Lasso Quick Code will automatically display the results of the code in the Result box. When not checked, nothing will be output.
Setting Up Data Sources
This section describes how to configure data sources for use with Lasso Server, and is divided into the following sections.
Overview provides an overview of data source connectors in Lasso Professional Server.
- FileMaker Server Data Sources provides instructions for setting up FileMaker Server 7, 8, 9, 10, or 11 Advanced and FileMaker Server 9, 10, or 11 data sources.
- MySQL Data Sources provides instructions for setting up a MySQL data source.
- Oracle Data Source provides instructions for setting up Oracle data sources.
- PostgreSQL Data Source provides instructions for setting up PostgreSQL data sources.
- JDBC Data Sources provides instructions for setting up data sources using a JDBC driver.
- ODBC Data Sources provides instructions for setting up data sources using an ODBC driver.
- SQLite Data Source describes the SQLite data source built into Lasso.
Overview
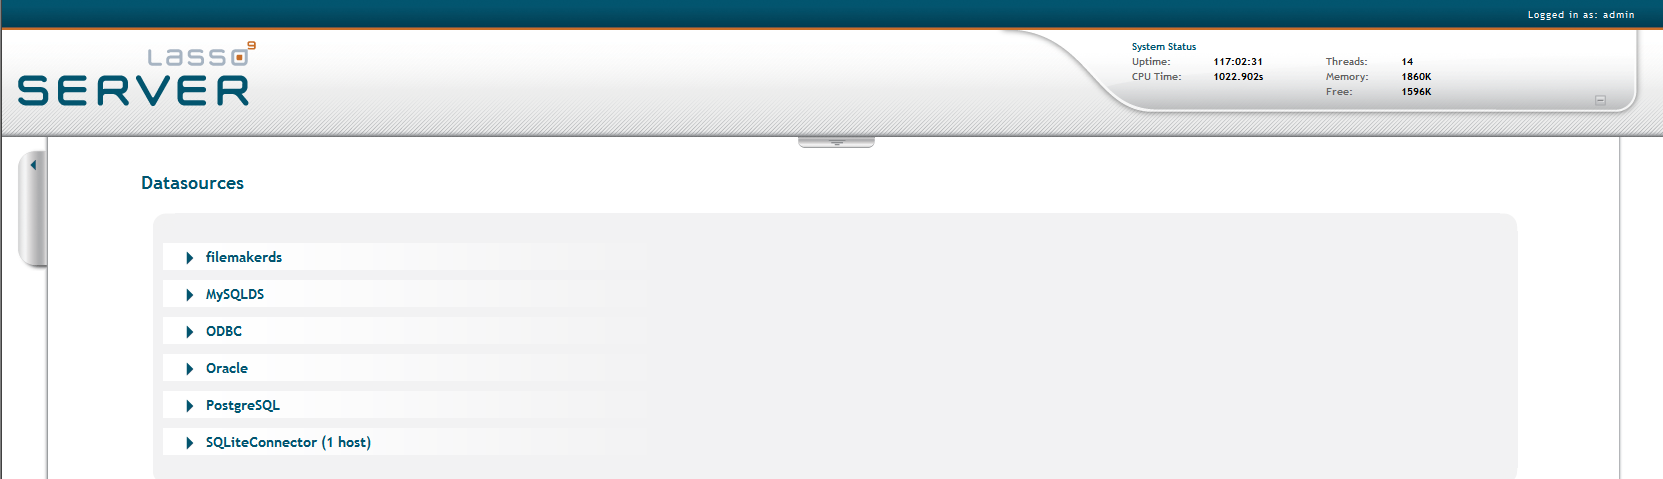
Lasso Professional Server communicates with data sources using Lasso data source connectors, which are modular components configured using the Setup > Data Sources section of Site Administration. Lasso Professional Server provides built-in connectors all of the data sources listed in the following table.
Most connectors can access data sources which are installed on the same machine as Lasso or on a remote machine. Some connectors can only access files on the local machine. Whether or not an ODBC or JDBC data source can communicate with Lasso on a separate machine depends on whether or not the driver can communicate via TCP/IP.
Custom data source connectors for other data sources can also be created for use with Lasso Server using LJAPI, LCAPI, or Lasso Tags. Information about creating and using third-party data source connectors can be found in the Language Guide.
| Data Source | Notes |
|---|---|
| FileMaker Server | Supports FileMaker Server 7, 8, 9, 10, or 11 Advanced and FileMaker Server 9, 10, or 11 |
| MySQL | Supports MySQL 3.x, 4.x, or 5.x data sources. |
| Oracle | Supports Oracle data sources. The Oracle "Instant Client" libraries must be installed in order to activate this data source. See the Oracle Data Sources section for more information. |
| PostgreSQL | Supports PostgreSQL data sources. The PostgreSQL client libraries must be installed in order to activate this data source. See the PostgreSQL Data Sources section for more information. |
| JDBC | Supports any data source with a compatible JDBC driver. See the JDBC Data Sources section for details about how to install JDBC drivers. |
| ODBC | Support any data source with a compatible ODBC driver. See the ODBC Data Sources section for details about how to install ODBC drivers. |
| SQL Server | Supports Microsoft SQL Server. The SQL Server client libraries must be installed in order to activate this data source. See the SQL Server Data Sources section for more information. |
| SQLite | SQLite is also the internal data source which is used for the storage of Lasso's preferences and security settings. |
Using Lasso Data Source Connectors
Data source connectors allow database actions to be performed via Lasso Web pages and Lasso pages. Database actions can be used in Lasso to search for records in a database that match specific criteria, to navigate through the found set from a database search, to add, update, or delete a record in a database, to fetch schema information about a database, and more. In addition, database actions can be used to execute SQL statements in SQL-compliant databases.
Interacting with data sources via Lasso Professional Server involves four steps:
- Configuring the data source application or service to accept connections from Lasso Server. This is done in the data source itself, outside of the Lasso Server Admin. This section describes configuring each data source to accept connections from Lasso Server.
- Data sources can be connected to directly by specifying the host parameters directly within inlines. Using this method does not require setting up the data source in the Lasso Serer Admin. This method is best used when developing sites where some security can be sacrificed for coding efficiency.
- Configure Lasso Server to communicate with a data source host. This involves adding the data source connection information in the Datasource section. This section describes creating connections with MySQL; FileMaker Server 7, 8, 9, 10 or 11 Advanced; FileMaker Server 9, 10, or 11, and JDBCcompliant data sources.
- Write Lasso code to interact with the data source. This is covered in the Database Interaction section of the Language Guide.
Viewing Lasso Data Source Connectors
The Datasource page in Lasso Server Amin is where all data source connectors can be listed, viewed, enabled, or disabled. This page shows all connectors currently installed to Lasso Server and list all available hosts for each connector.
Data sources which require additional set up will be marked as Unavailable in this listing. Consult the appropriate section of this chapter for details about how to install the additional components necessary to enable the data source. JDBC data sources will not show up unless drivers have been installed in the JDBCDrivers folder.
FileMaker Server Data Sources
Lasso Professional Server communicates with FileMaker Server 7, 8, 9, 10, or11 Advanced and FileMaker Server 9, 10, or 11 through the built-in XML interface. Lasso cannot communicate with any other products in the FileMaker 7, 8 or 9 product line such as FileMaker Pro.
Requirements
FileMaker Server 9, 10, or 11 for Windows or Mac OS X (or FileMaker Server 9, 10, or 11 Advanced). Or, FileMaker Server Advanced 7 or 8 for Windows or Mac OS X. The Web Publishing Engine must be installed and each database must be configured according to the instructions in the following section.
The latest versions of FileMaker Server can be downloaded from FileMaker, Inc.’s Web site at:
http://www.FileMaker.com
Configuring FileMaker Server 9 for Use With Lasso
This section describes setting up FileMaker Server 9, 10, or 11 or FileMaker Server 9, 10, or 11 Advanced for use with Lasso Server. These versions will be referred to collectively as version 11.
To configure FileMaker Server:
Follow the instructions included with FileMaker Server carefully. Setting up FileMaker Server is considerably easier than setting up earlier versions of Filemaker Server.
- Make sure that the Web Serving options are turned on and that the XML interface is enabled.
- The databases which are to be accessed by Lasso must be in the FileMaker Server Data/Databases folder and must be Open within FIleMaker Server.
- Each database to be accessed by Lasso must have the fmxml keyword added to the Extended Privileges section of the Accounts & Privileges dialog box. The username and password which are entered into the Lasso Server Admin must use a Privilege Set which has access to this extended privilege.
- FileMaker Pro database security in Lasso Professional Server is only as secure as the Publishing Engine setup. It is possible for Web browsers to communicate directly with the Publishing Engine It is strongly recommended that the security features of FIleMaker Pro be used to secure accessible databases.
- It is strongly recommended that only a single IP address is permitted to access the Publishing Engine which represents the machine on which Lasso Professional Server operates.
- For tips on optimizing performance for FileMaker databases, see FileMaker Data Sources in the Lasso Language Guide.
Configuring FileMaker Server 7 or 8 Advanced for Use With Lasso
This section describes setting up FileMaker Server Advanced for use with Lasso Server.
To configure FileMaker Server Advanced:
Follow the instructions included with FileMaker Server Advanced carefully. There are several steps in the process which are not obvious and require reading the document to set up properly. Configuring FileMaker Server Advanced is beyond the scope of this documentation, but some common pitfalls are listed below.
- Make sure both FileMaker Server and the FileMaker Server Advanced Publishing Engine are installed. The machine with the Publishing Engine must be running a supported Web server.
- Configure FileMaker Server with a Client Services identifier and passcode. Enter this same identifier and passcode in the Web Publishing Administration Console.
- Ensure XML Publishing is turned on in the Web Publishing Administration Console.
- The databases which are to be accessed by Lasso must be in the FileMaker Server Data/Databases folder and must be Open within FIleMaker Server.
- Each database to be accessed by Lasso must have the fmxml keyword added to the Extended Privileges section of the Accounts & Privileges dialog box. The username and password which are entered into the Lasso Server Admin must use a Privilege Set which has access to this extended privilege.
- FileMaker Pro database security in Lasso Professional Server is only as secure as the Publishing Engine setup. It is possible for Web browsers to communicate directly with the Publishing Engine, which circumvents Lasso security. It is strongly recommended that the security features of FIleMaker Pro be used to secure accessible databases.
- It is strongly recommended that only a single IP address is permitted to access the Publishing Engine which represents the machine on which Lasso Professional Server operates.
- For tips on optimizing performance for FileMaker databases, see FileMaker Data Sources in the Lasso Language Guide.
Creating Connections to FileMaker Server Hosts
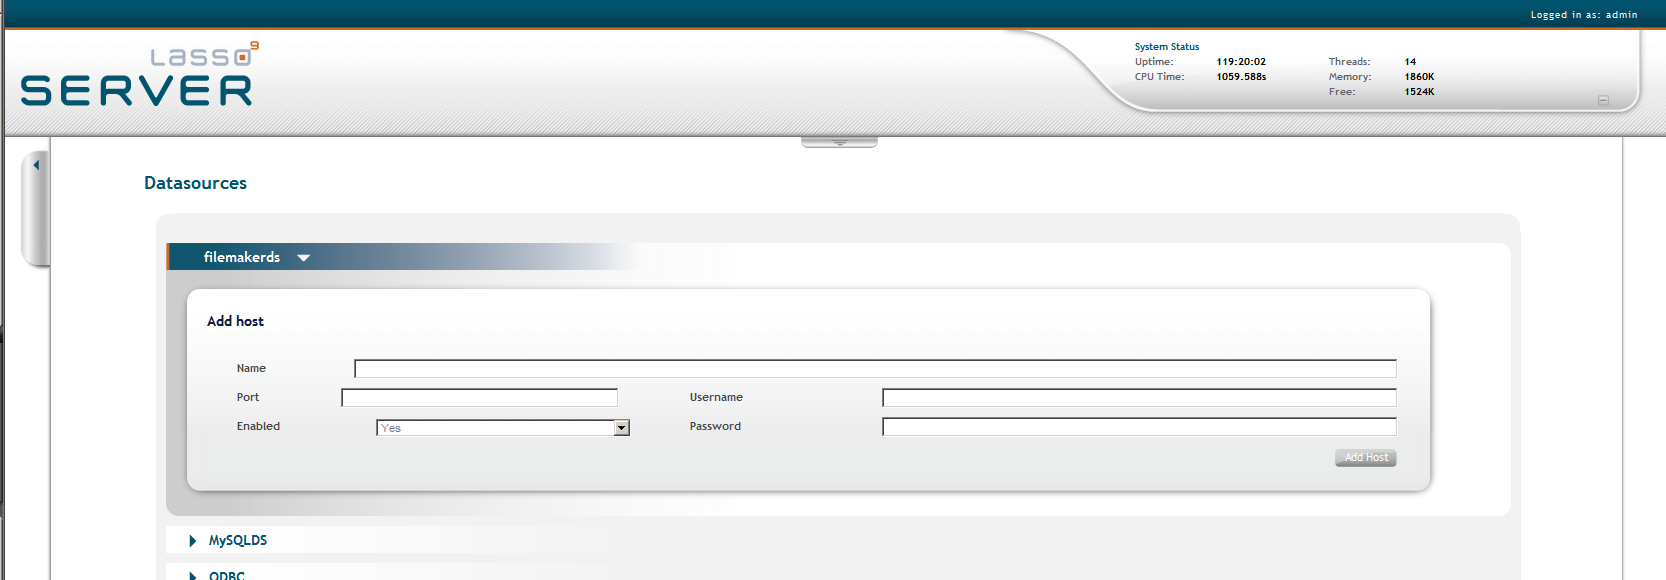
Adding Data Source Hosts
- In the Add Host panel, enter the ip/domain name where the FileMaker datasources are being hosted.
- Enter the TCP/IP port of the data source application or service of the host in the Port field. See the FileMaker Server documentation for information on where to find or set this in the data source. This is commonly 80 for FileMaker Server.
- Select Yes from the Enabled pull-down menu to enable the host.
- Enter a username for the host in the Host Username field. Lasso Server will connect to the data source and all databases therein using this username by default. If the host does not require a username, then leave this field blank.
- Enter a password for the host in the Host Password field. Lasso Server will connect to the data source and all databases therein using this password by default. If the host does not require a password, then leave this field blank.
- Select the Add Host button.
- Once the host is added, the new host appears in the Hosts Listing panel below the connector listing. There, one expand the host listing to expose a list of all available databases for the specified host.
Specifying FileMaker Server Hosts in Inlines
Setting up a data source host is the best way to ensure that access to the data source is fully controlled. However, it can sometimes be beneficial to access a data source host without a lot of configuration. This section describes how to construct an inline which access a FileMaker Server data source host. See the Lasso Language Guide for full details about inline host specification.
To access a FileMaker Server host directly in an inline:
The -Host parameter can be used to specify all of the connection parameters for a data source host. The -Host array should contain the following elements. The -Datasource should be specified as filemakerds. The -Name should be specified as the URL of the machine hosting FileMaker Server. The -Port is optional and defaults to 80. The -Username and -Password should be specified.
For example, the following code shows how a connection to a FileMaker Server data source hosted on the same machine as Lasso might appear.
inline( -host=Array(
				-datasource='filemakerds',
				-name='localhost',
				-port='80',
				-username='username',
				-password='password' ),
		-database='database', -table='table', -findall ) => {^
	found_count;
^} // Close inline
Enabling FileMaker Server Databases
MySQL Data Sources
This section provides instructions for setting up a MySQL data source for use with Lasso Professional via Lasso Connector for MySQL. A MySQL service running on a host machine is able to communicate with
Lasso Server via a TCP/IP port. This can be on the same machine as Lasso Server, or on a separate machine. For more information on MySQL, see the following URL:
http://www.mysql.com
Requirements
Lasso Server is certified to work with default installations of MySQL 3.23, MySQL 4.x, and MySQL 5.x (release versions). Newer versions or modified versions of MySQL may work with Lasso Server, but are not officially supported.
For Lasso Professional Server to successfully communicate with a MySQL host, the following requirements must be met.
- The MySQL service must be running.
- MySQL must be assigned a port with no conflicts in which to communicate. For standard versions of MySQL, this is port 3306 by default.
- Access privileges must be assigned in MySQL to the machine running Lasso Server for any or all levels (database-level, table-level, column-level, etc.) of security.
- Note: Links to third party distributions and tools are provided for your convenience and were accurate when this manual was written. LassoSoft cannot be responsible for the availability or suitability of software downloaded from third party Web sites.
Configuring MySQL Hosts For Use With Lasso
MySQL is operated via a command-line interface application, which is normally located in the bin directory of the MySQL installation on the client machine. For information on how to use this, consult the MySQL
documentation.
Security for MySQL data sources can be set at any level (MySQL-level, database-level, table-level, etc.). All permissions for all levels of security need to be given to Lasso Server for unrestricted operation. This involves setting a new user and password for Lasso Server in MySQL, then entering the username and password in the Lasso Server Admin. Follow the procedure below for granting all permissions to Lasso Server in MySQL using the MySQL command line utility.
To grant all permissions to Lasso Server in MySQL:
-
In the command line utility, log in to MySQL as the root user by entering the following command:
mysql -u root -p your_password;
Replace your_password with the root password for MySQL specified during the MySQL installation. For instructions on how to set or change the MySQL root password, see the MySQL documentation. -
Enter the following to assign a username and password for Lasso Professional Server to gain access to all levels of security in MySQL.
GRANT ALL ON *.* TO Username@Hostname IDENTIFIED BY "Password";
Replace Username and Password with the username and password values you wish to assign to Lasso Server. These will be used in the Datasources section in the Lasso Server Admin, as described in the Setting Up Data Sources section. Replace Hostname with the host name or IP address of the machine on which Lasso Server is installed. This will restrict the access of this username and password to the machine running Server for added security. ALL represents all MySQL action permissions (e.g. INSERT, SELECT, DELETE, etc.), and the *.* characters represent all levels of security in MySQL (e.g. database-level, table-level, etc.).
Lasso Server now has all appropriate permissions to communicate with MySQL, and the MySQL host may now be configured in the Datasources section of the Lasso Server Admin. See the Setting Up Data Sources section for more information.
Note: It is possible to assign limited privileges to Lasso Server one at a time by replacing ALL with an individual permission (e.g. INSERT, SELECT, DELETE), and replacing *.* with a specific database or table name. This will restrict the functionality of Lasso Server to the privileges that are assigned to it. For example, giving Lasso Server only the SELECT privilege will allow a MySQL database to be searched using Lasso, but records cannot be added, updated, or deleted using Lasso.
Creating Connections to MySQL Hosts
The Datasources page in the Lasso Server Admin displays all data source hosts for a selected data source connector, and allows the administrator to add new hosts. A host is a computer that serves the databases with which Lasso Server communicates.

Expanding the connectors exposes a listing of all the hosts available for the current connector.
Adding Data Source Hosts
- In the Add Host panel, enter the ip/domain name where the MySQL datasources are being hosted.
- Enter the TCP/IP port of the data source application or service of the host in the Port field. This is commonly 3306 for MySQL.
- Select Yes from the Enabled pull-down menu to enable the host.
- Enter a username for the host in the Host Username field. Lasso Server will connect to the data source and all databases therein using this username by default.
- Enter a password for the host in the Host Password field. Lasso Server will connect to the data source and all databases therein using this password by default.
- Select the Add Host button.
- Once the host is added, the new host appears in the Hosts Listing panel below the connector listing. There, one expand the host listing to expose a list of all available databases for the specified host.
Specifying MySQL Hosts in Inlines
Setting up a data source host is the best way to ensure that access to the data source is fully controlled. However, it can sometimes be beneficial to access a data source host without a lot of configuration. This section describes how to construct an inline which access a MySQL data source host. See the Lasso Language Guide for full details about inline host specification.
To access a MySQL host directly in an inline:
The -Host parameter can be used to specify all of the connection parameters for a data source host. The -Host array should contain the following elements. The -Datasource should be specified as mysqlds. The -Name should be specified as the URL of the machine hosting FileMaker Server. The -Port is optional and defaults to 3306. The -Username and -Password should be specified.
For example, the following code shows how a connection to a MySQL data source hosted on the same machine as Lasso might appear.
inline( -host=Array(
				-datasource='mysqlds',
				-name='localhost',
				-port='3306',
				-username='username',
				-password='password' ),
		-database='database', -table='table', -findall ) => {^
	found_count;
^} // Close inline
Enabling MySQL Databases
Oracle Data Sources
This section provides instructions for setting up an Oracle data source for use with Lasso Server. An Oracle service running on a host machine is able to communicate with Lasso Professional Server via a TCP/IP port. The data source can be on the same machine as Lasso Server or on a separate machine. For more information on Oracle, see the following URL:
http://www.oracle.com/
Requirements
Lasso Server has been tested with the following versions of this data source.
- Oracle Database 10g
Lasso’s Oracle data source requires the Oracle “Instant Client” to be installed in order to access Oracle hosted on another machine. If Lasso is hosted on the same machine as Lasso then this is not necessary. The instant client can be downloaded from the following Web site. Make sure to download just the basic instant client files rather than the complete Oracle 10g client or database installation.
http://www.oracle.com/technetwork/database/features/instant-client/index-097480.html
-
Mac OS X
- Download version 10.0.2.4 of the Instant Client for Mac OS X.
- Decompress the archive, which will create a folder "instantclient_10_2"
- Copy the contents of folder into "/usr/local/oracle/lib/"
-
Execute the following command to create symlinks so that Lasso can find the Oracle libraries. (sudo will require that you enter your password in order to continue.)
- sudo ln -sf /usr/local/oracle/lib/* /usr/local/lib/
-
Execute the following command to create a symlink to the libclntsh.dylib.10.1 so that Lasso can load the library.
- sudo ln -s /usr/local/lib/libclntsh.dylib.10.1 /usr/local/lib/libclntsh.dylib
-
Linux
- Download version 11.2.0.2.0 of the Instant Client for Linux
- Decompress the archive, which will create a folder "instantclient_11_2"
- Copy the contents of the folder into "/usr/local/oracle/lib/"
-
Execute the following command to create symlinks so that Lasso can find the Oracle libraries. (sudo will require that you enter your password in order to continue.)
- sudo ln -sf /usr/local/oracle/lib/* /usr/local/lib/
-
Execute the following command to create a symlink to the libclntsh.so.11.1 so that Lasso can load the library.
- sudo ln -s /usr/local/lib/libclntsh.so.11.1 /usr/local/lib/libclntsh.so
Note: Links to third party distributions and tools are provided for your convenience and were accurate when this manual was written. LassoSoft cannot be responsible for the availability or suitability of software downloaded from third party Web sites.
Configuring Oracle Hosts For Use With Lasso
The Oracle database server must be configured with a user which has access to all of the databases, tables, and other resources which will be published through Lasso. Consult the Oracle documentation for help configuring Oracle’s built-in security. The Oracle Web site has a Getting Started section which explains how to install and perform basic configuration of an Oracle database server.
http://www.oracle.com/pls/db111/portal.portal_db
Adding Oracle Hosts to Lasso
The Datasources page in Lasso Server Admin displays all data source hosts for a selected data source connector, and allows the administrator to add new hosts. A host is a computer that serves the databases with which Lasso communicates and has an associated username and password.
Important: If the client libraries for Oracle have not been installed properly then a warning message will appear on this page. Consult the Requirements section above for instructions to install the Oracle client libraries which Lasso requires.
To add a new Oracle host:
-
In the Add Host panel, enter the ip/domain name where the Oracle datasources are being hosted, the port, and database name in the format:
: /
For example:
www.mydomain.com:1521/Mydatabase - Enter the TCP/IP port of the data source application or service of the host in the Port field. This is commonly 1521 for Oracle.
- Select Yes from the Enabled pull-down menu to enable the host.
- Enter a username for the host in the Host Username field. Lasso Server will connect to the data source and all databases therein using this username by default.
- Enter a password for the host in the Host Password field. Lasso Server will connect to the data source and all databases therein using this password by default.
- Select the Add Host button.
Once the host is added, the new host appears in the Hosts Listing panel below the connector listing. There, one expands the host listing to expose a list of all available databases for the specified host.
Enabling Oracle Databases
Databases in newly created hosts are enabled by default. The Administrator can disable databases by expanding the database listing and setting the Enabled drop-down to No. This provides a method for the Lasso site administrator to designate which databases can and cannot be used with Lasso.
Specifying Oracle Hosts in Inlines
Setting up a data source host is the best way to ensure that access to the data source is fully controlled. However, it can sometimes be beneficial to access a data source host without a lot of configuration. This section describes how to construct an inline which access an Oracle data source host. See the Lasso Language Guide for full details about inline host specification.
To access an Oracle host directly in an inline:
The -Host parameter can be used to specify all of the connection parameters for a data source host. The -Host array should contain the following elements. The -Datasource should be specified as oracle. The -Name should be specified the same as the Connection URL described above, e.g. oracle.example.com:1521/mydatabase. The -Username and -Password must be specified.
For example, the following code shows how a connection to the same Oracle database server which was configured above might appear.
inline( -host=Array(
				-datasource='oracle',
				-name='oracle.example.com:1521/mydatabase',
				-port='1521',
				-username='username',
				-password='password' ),
		-database='database', -table='table', -findall ) => {^
	found_count;
^} // Close inline
PostgreSQL Data Sources
This section provides instructions for setting up a PostgreSQL data source for use with Lasso Server. A PostgreSQL service running on a host machine is able to communicate with Lasso Server via a TCP/IP port. The data source can be on the same machine as Lasso Server or on a separate machine. For more information on PostgreSQL, see the following URL:
http://www.postgresql.org/
Requirements
Lasso Server has been tested with the following versions of this data source.
-
PostgreSQL 8.x
On any platform it is necessary to install libpq library on the Lasso machine, even in order to access a copy of PostgreSQL hosted on another machine. The libpq library can be obtained by installing PostgreSQL on the Lasso machine, downloading from a third party site, or building PostgreSQL locally. Distributions of PostgreSQL for Windows, Mac, and Linux can be found at the PostgreSQL Web site.
http://www.postgresql.org/
Configuring PostgreSQL Hosts For Use With Lasso
The PostgreSQL database server must be configured with a user which has access to all of the databases, tables, and other resources which will be published through Lasso. Consult the PostgreSQL documentation for help configuring PostgreSQL’s built-in security.
http://www.postgresql.org/docs/manuals/
Adding PostgreSQL Hosts to Lasso
The Datasources page in Lasso Server Admin displays all data source hosts for a selected data source connector, and allows the administrator to add new hosts. A host is a computer that serves the databases with which Lasso communicates and has an associated username and password.
Important: If the client libraries for PostgreSQL have not been installed properly then a warning message will appear on this page. Consult the Requirements section above for instructions to install the PostgreSQL client libraries which Lasso requires.
To add a new PostgreSQL host:
-
In the Add Host panel, enter the ip/domain name where the PostgreSQL datasources are being hosted
-
Enter the TCP/IP port of the data source application or service of the host in the Port field. This is commonly 5432 for PostgreSQL.
-
Select Yes from the Enabled pull-down menu to enable the host.
-
Enter a username for the host in the Host Username field. Lasso Server will connect to the data source and all databases therein using this username by default.
-
Enter a password for the host in the Host Password field. Lasso Server will connect to the data source and all databases therein using this password by default.
-
Select the Add Host button.
Once the host is added, the new host appears in the Hosts Listing panel below the connector listing. There, one expands the host listing to expose a list of all available databases for the specified host.
Enabling PostgreSQL Databases
Databases in newly created hosts are enabled by default. The Administrator can disable databases by expanding the database listing and setting the Enabled drop-down to No. This provides a method for the Lasso site administrator to designate which databases can and cannot be used with Lasso.
Specifying PostgreSQL Hosts in Inlines
Setting up a data source host is the best way to ensure that access to the data source is fully controlled. However, it can sometimes be beneficial to access a data source host without a lot of configuration. This section describes how to construct an inline which access an PostgreSQL data source host. See the Lasso Language Guide for full details about inline host specification.
To access an PostgreSQL directly in an inline:
The -Host parameter can be used to specify all of the connection parameters for a data source host. The -Host array should contain the following elements. The -Datasource should be specified as oracle. The -Name should be specified the same as the Connection URL described above. The -Username and -Password must be specified.
For example, the following code shows how a connection to the same PostgreSQL database server which was configured above might appear.
inline( -host=Array(
				-datasource='postgres',
				-name='postgresql.example.com',
				-port='5432',
				-username='username',
				-password='password' ),
		-database='database', -table='table', -findall ) => {^
	found_count;
^} // Close inline
SQLite Data Sources
Lasso Server comes with an embedded high-performance data source called SQLite. This data source is used to store Lasso’s internal site preferences and security settings. SQLite is installed, enabled, and pre-configured within Lasso Server by default. No further set up or installation of SQLite is required.
Using SQLite Databases
SQLite databases are stored in the SQLiteDBs folder within each instance's folder. By default this folder contains databases that are required for Lasso Server to function, as documented in the Using Site Administration section.
Custom databases may be created and added to this folder three different ways:
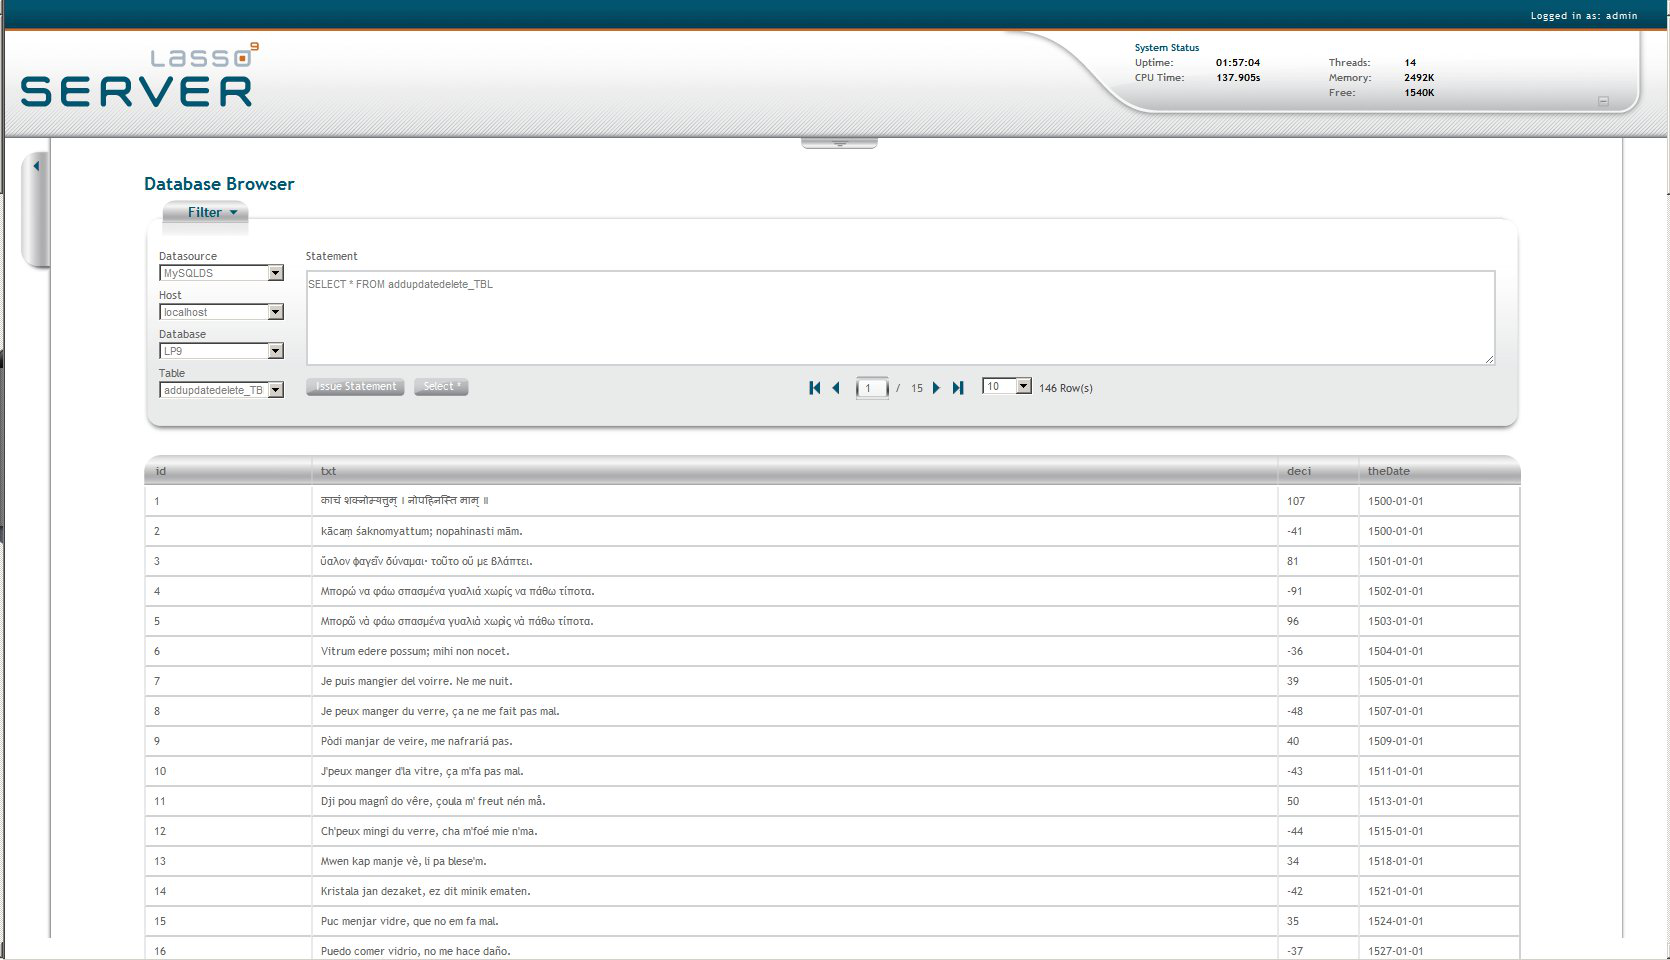
- Creating custom SQLite databases using DB Browser, which is described in the Building and Browsing Databases section.
- Creating SQlite databases using a third-party tool and moving them into the SQLiteDBs folder.
Enabling Custom SQLite Databases
Once custom SQLite databases are created or moved to the SQLiteDBs folder, they can be used in Lasso code or tested using the Browse section of the DB Browser tool.
ODBC Data Sources
This section provides instructions for setting up data source through ODBC for use with Lasso Server. An ODBC driver set up as a system data source (System DSN) is required in order to access the data source through Lasso. The data source can be on the same machine as Lasso Server or on a separate machine. For more information on ODBC, see the documentation included with your operating system:
Requirements
Lasso’s ODBC data source requires a compatible ODBC driver which has been configured as a System DSN in the ODBC control panel.
- Windows – ODBC data sources are configured using the ODBC Data Source Administrator which is normally accessed through Settings > Control Panels > Administrative Tools > Data Sources (ODBC). Lasso can access data sources configured as System DSNs.
- Mac OS X – ODBC data sources are configured using the ODBC Administrator which is can be found in the Applications/Utilities folder. Lasso can access data sources configured as System DSNs.
- Linux – Consult the documentation of the ODBC drivers for information about how to set up data sources on Linux. Many ODBC drivers ship with a control panel which allows configuration of those drivers. Lasso can access data sources configured as System DSNs.
Configuring ODBC Hosts For Use With Lasso
Consult the documentation for your data sources and ODBC drivers for details about how to secure access to the data made available through the driver. Most data sources will require the following steps:
- Install your ODBC driver using the provided installer or instructions.
- Create a System DSN in the ODBC administration application (see above). Note that the System DSN name, username, and password which are configured here will need to be entered in Lasso.
- Locate and configure the SQL.ini file for your driver. This file sets the options for your ODBC driver including the location of your data source. Consult your driver’s documentation for details about where to find this file and what options can be configured.
- Follow the steps below to add the data source to Lasso.
Adding ODBC Hosts to Lasso
The Datasources page in Lasso Server Admin displays all data source hosts for a selected data source connector, and allows the administrator to add new hosts. A host is a computer that serves the databases with which Lasso communicates and has an associated username and password.
To add a new Oracle host:
- In the Add Host panel, enter the System DSN name of the ODBC connection.
- Enter the TCP/IP port of the data source application or service of the host in the Port field.
- Select Yes from the Enabled pull-down menu to enable the host.
- Enter a username for the host in the Host Username field. Lasso Server will connect to the data source and all databases therein using this username by default.
- Enter a password for the host in the Host Password field. Lasso Server will connect to the data source and all databases therein using this password by default.
- Select the Add Host button.
Once the host is added, the new host appears in the Hosts Listing panel below the connector listing. There, one expands the host listing to expose a list of all available databases for the specified host.
Specifying ODBC Hosts in Inlines
Setting up a data source host and properly configuring Lasso security is the best way to ensure that access to the data source is fully controlled. However, it can sometimes be beneficial to access a data source host without a lot of configuration. This section describes how to construct an inline which access an ODBC data source host. See the Lasso Language Guide for full details about inline host specification.
To access an ODBC host directly in an inline:
The -Host parameter can be used to specify all of the connection parameters for a data source host. The -Host array should contain the following elements. The -Datasource should be specified as odbc. The -Name should be specified as the System DSN, e.g. exampledatabase. The -username and -Password should be specified if required by the ODBC driver.
For example, the following code shows how a connection to the same ODBC data source which was configured above might appear.
inline( -host=Array(
				-datasource='odbc',
				-name='System_DSN_Name',
				-username='username',
				-password='password' ),
		-database='database', -table='table', -findall ) => {^
	found_count;
^} // Close inline
Log Book
The Log Book allows the administrator to view and delete errors, warnings detail messages, deprecated functionality warnings, and action statements that have been logged both internally in Lasso Server and via the [Log] tag, as well as set site logging options. For more information on the [Log] tag, see the Files and Logging chapter in the Lasso Language Guide.
Important: Configuring error logging in Lasso Server Administration is not the same thing as configuring page-level error handling, such as for syntax errors and security errors. Page-level error handling is described in the Error Reporting chapter of the Lasso Language Guide.
Lasso Errors
The Lasso Errors page lists all errors and system messages stored in the Lasso_Internal database. Errors and system messages can also be deleted within this interface.
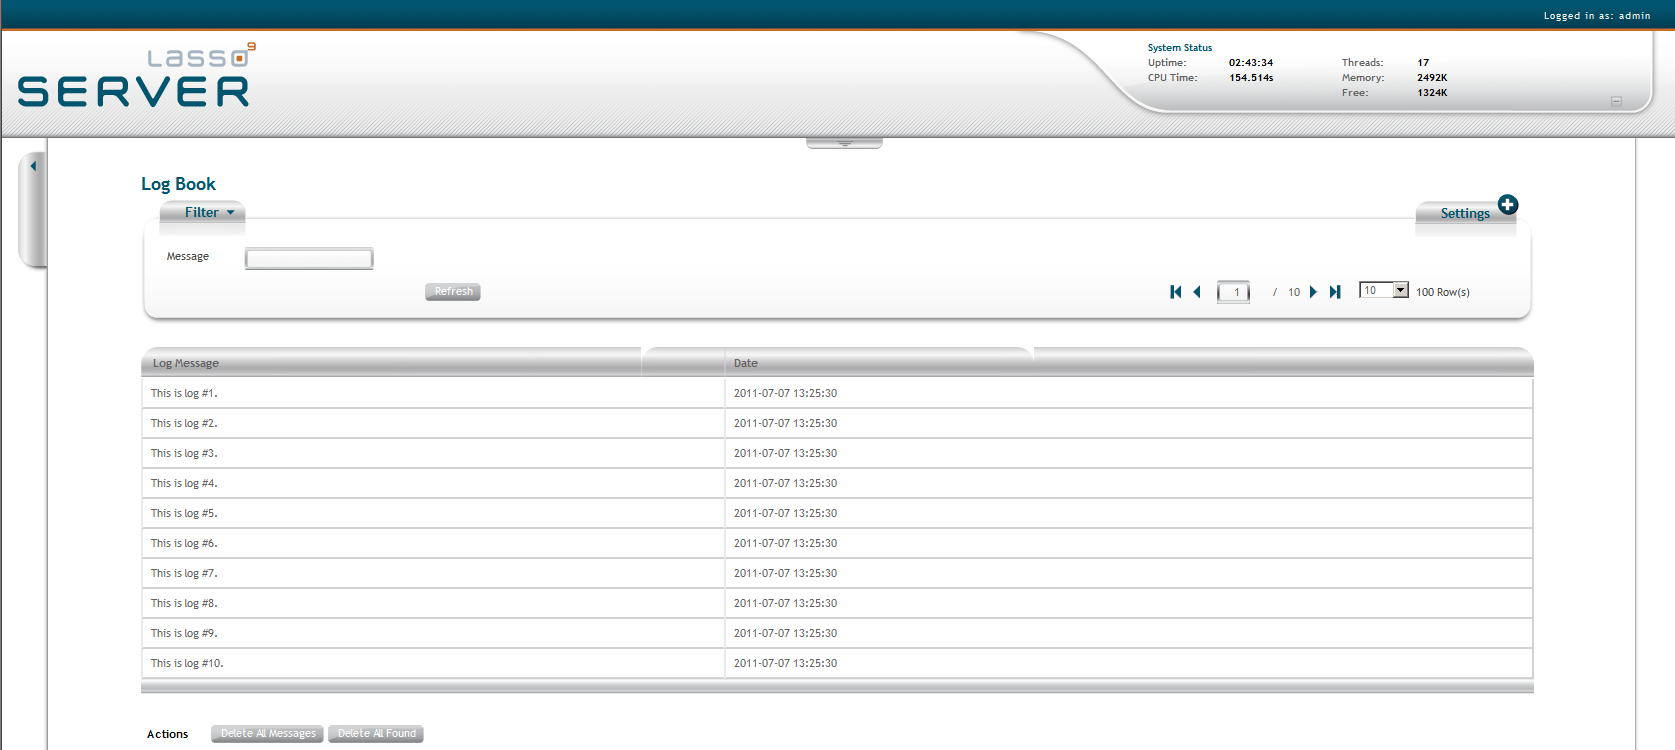
Deleting Messages
Log Book Setup
- Critical Errors – This includes fatal errors that affect the overall functionality of Lasso Server. This can include startup errors, module and connector errors, and system-related errors that cause Lasso Server not to function properly.
- Warnings – This includes non-fatal errors that do not affect the overall functionality of Lasso Server, but the administrator should be aware of. This can include non-fatal startup errors, duplicate module or connector errors, SQL status errors, and logging errors.
- Detail – This logs all processes performed by Lasso Service, which are not limited to errors.
- Deprecated – This logs warnings when deprecated tags or other functionality are used. Any deprecated tags or functionality may not be supported in a future version of Lasso.
- SQL – This logs the action statements (e.g. SQL statements) from inline database actions.
For each feedback type, the administrator can choose to log or display feedback in any of the following three places:
- Lasso Service Console – If selected, feedback will be displayed in the Lasso Service console window when Lasso Service has been started as an application. For more information on starting Lasso Service as an application, see the configuration chapters of this guide.
-
Error Database – If selected, feedback will be logged to the _Errors table in the Lasso_Internal database and displayed in the Log Book in the Lasso Server Adminstration.
- Note: The _Errors table will store a maximum of 10,000 records. Once this limit has been reached, the oldest records will automatically be deleted.
- lasso.out.txt – If selected, feedback will be logged to the LassoErrors.txt file in the Lasso Professional Server folder in the hard drive.
Options are changed by checking or unchecking the desired values in the Log Book Settings panel and selecting the Save button. Selecting the Refresh button reloads the Log Book page with its currently stored values.
Note: For information on how to programmatically log custom data to the logs described above, see the Files and Logging chapter in the Lasso Language Guide.
Email Queue
The email queue logs all email messages that are sent from Lasso Server. Messages remain in the queue while they are being sent to the SMTP mail server looked up by Lasso or specified in the [Email_Send] method by the developer. For more information, see the Email chapter in the Lasso Language Guide.
Each message may include one or more parts depending on the recipients of the message. A message to one recipient always has one part. If a message has several recipients who are in different domains then the message will be split into one part per domain. Information about the first part of a message is shown inline within the message display. The message display also includes the most recent error returned for the message. Messages in the queue can be viewed by status by selecting a message category from the pull-down menu in top panel, and then selecting the Select button. These categories are as listed below.
- All Messages – Shows all messages in the email queue.
- Queued – Shows messages currently queued in the email queue.
- Sending– Shows all messages that are currently sending.
- Error – Shows all messages that were unable to be sent in the email queue due to an error.
Session
The Sessions page allows an administrator view session information in real time. The location where sessions will be stored can also be configured.
Memory Sessions
Lasso Server provides a new in-memory session driver which allows sessions to be served very fast. When the memory session driver is selected sessions will only persist until Lasso Service is restarted.
The memory session driver can be selected by choosing Memory from the Serve Sessions From menu and clicking the Select button.
The default SQLite storage driver can be reselected by choosing Local Default from the Serve Sessions From menu and clicking the Select button.
Multi-Server Session Support
Lasso Server provides the ability to share session data with other Lasso Server servers so that Lasso sessions can persist within load-balancing and redundant server configurations with
multiple Lasso Professional Server servers.
Session sharing is achieved by designating a single external MySQL host to serve all Lasso session data, and then configuring each Lasso Server instance to store all session data on this host.
For best performance, the session tuning parameters described below should be used to establish one Lasso server as the master of the session table which will perform routine maintenance. Each of the other Lasso servers that are sharing the same MySQL table should be set to never delete expired sessions.
Warning: Configuring Lasso to store all session data on an external MySQL host creates a dependency on that external host in order for sessions to work. It is strongly recommended that the MySQL server be on the same network as the Lasso Professional Server servers.
Configuring an External Session Host
The Session Data Server panel allows the administrator to set the MySQL host that will be used to store all session data for the current Lasso Server server.
To create and use an external sessions table:
- In the Driver pull-down menu, select MySQL. This specifies that a session table other then the default site.sessions table will be used.
- Next to Database, select the database where to want a sessions table to be created. This menu contains a list of all enabled MySQL databases in the Data Sources section of the Lasso Server Administration.
- Select the Create Sessions Table button.
- A popup dialog will appear allowing an administrator to specify the name of the session table.
- Click the Select As Default button. This table will be used to store all session data until the host is manually switched again.
To select and use an existing external sessions table:
- In the Server Sessions From pull-down menu, select External Database. This specifies that a session table other then the default site.sessions table will be used.
- Next to Database, select the database that contains the sessions table you wish to use. This menu contains a list of all enabled MySQL databases in the Data sources section of Lasso Server Administration.
- Select the sessions table from the Table drop down. This table will be used to store all session data until the host is manually switched again.
Browsing Databases
 Please note that periodically LassoSoft will go through the notes and may incorporate information from them into the documentation. Any submission here gives LassoSoft a non-exclusive license and will be made available in various formats to the Lasso community.
Table of Contents
Random User Tips
Use
<? then the word 'LassoScript'
lasso_code('lost rhino');
this = is_just('a lost rhino');
//this is a comment
?>

LassoSoft Inc. > Home
©LassoSoft Inc 2015 | Web Development by Treefrog Inc | Privacy | Legal terms and Shipping | Contact LassoSoft